
Drywall Repair 101: Patching Small Holes vs. Large Damage
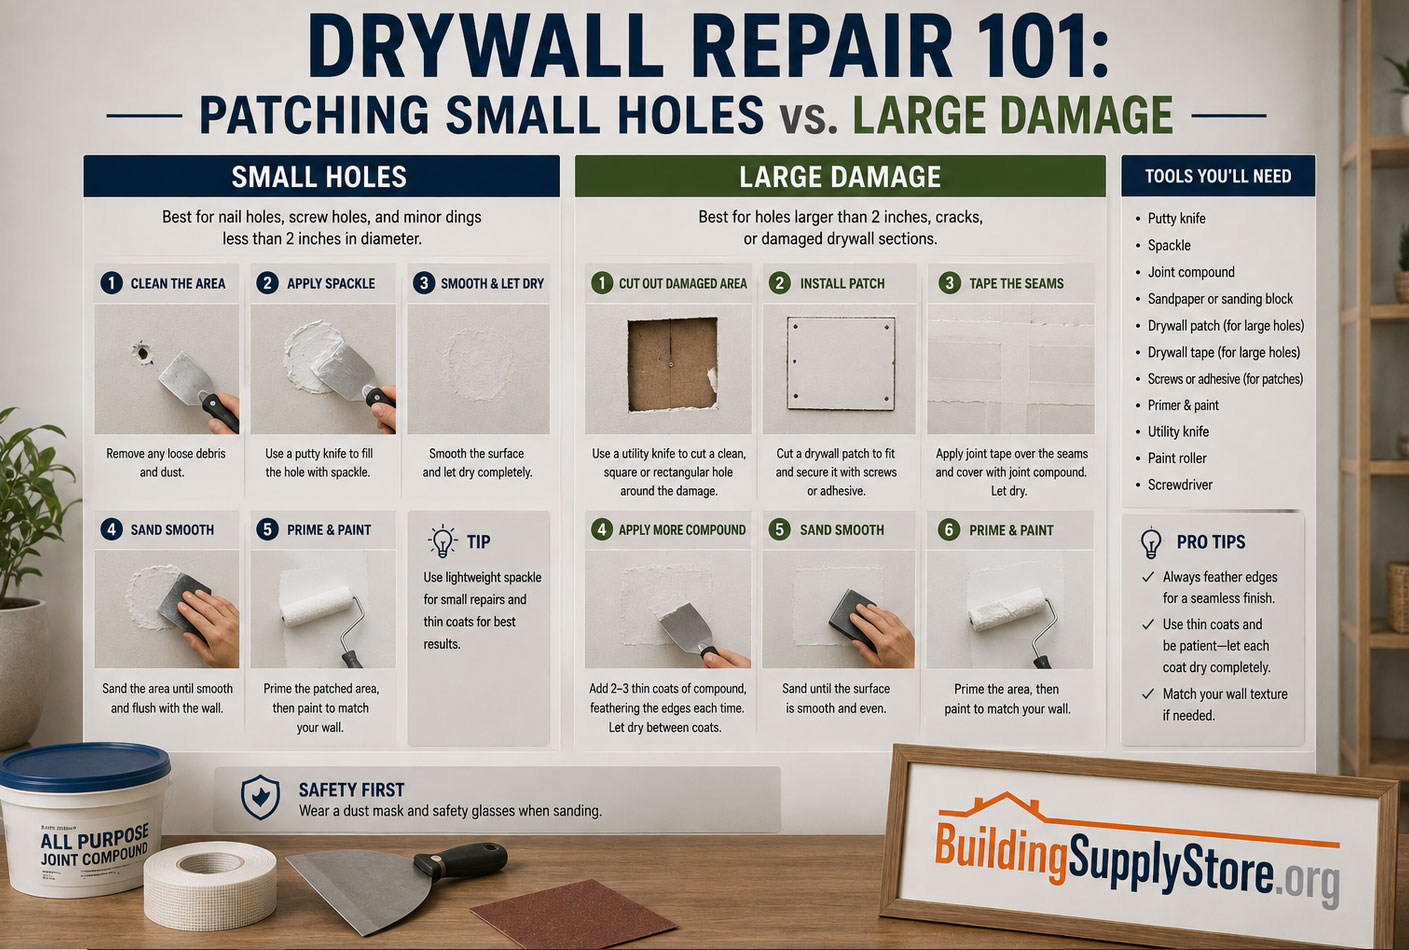
There's a particular kind of ego bruise that comes from denting a wall. Maybe it was a doorknob that finally found its mark after months of near-misses, or a moving day mishap involving a couch and a hallway corner that was never wide enough to begin with. Whatever the cause, the result is the same: a wound in the wall that seems to grow more noticeable every time you walk past it.
The good news is that drywall, for all its papery fragility, is one of the most forgiving building materials in your house to repair. The bad news is that most people treat every hole the same way, grabbing a tub of spackle for damage that actually needs a saw, or overbuilding a fix for a nail hole that would've closed up with a single swipe of a putty knife. Matching the repair method to the size and cause of the damage is the entire game. Get that right, and you'll save money, time, and the temptation to just hang a picture over the problem forever.
This guide walks through how to size up drywall damage honestly, then handles the two ends of the spectrum — small cosmetic holes and larger structural gaps — as the genuinely different projects they are.
What Drywall Actually Is (and Why It Behaves the Way It Does)
Before touching a wall, it helps to understand what you're working with. Drywall, also called gypsum board or wallboard, is a sandwich: a core of compressed gypsum plaster wrapped in heavy paper on both sides. That gypsum core is what gives drywall its fire resistance and sound-dampening properties, and it's also why the material is simultaneously sturdy against everyday wear and shockingly easy to punch through with a doorknob or a rogue elbow.
Standard residential walls typically use ½-inch drywall, while ceilings and fire-rated walls (like those between a garage and living space) often use ?-inch board. Bathrooms and other damp areas sometimes get moisture-resistant "greenboard" or cement board instead of standard paper-faced panels. Knowing your wall's thickness matters later, because a patch that doesn't match the surrounding board thickness will telegraph itself through the paint job forever, as a slightly raised or sunken rectangle no amount of sanding will fully erase.
Manufacturers like USG, National Gypsum, and CertainTeed all publish product-specific installation and repair guidance, which is worth a quick check if you're patching a specialty board — fire-rated, moisture-resistant, or soundproofing drywall behaves slightly differently under a taping knife than standard panels do.
Reading the Damage Before You Buy Anything
The single biggest mistake in drywall repair isn't a bad taping job — it's misdiagnosing the problem before you start. Spend two minutes actually assessing the damage, and you'll save yourself a return trip to the hardware store.
Ask three questions:
How big is it? As a rough rule of thumb, holes under 1 inch across are cosmetic nuisances. Holes between 2 and 6 inches sit in an awkward middle zone that needs a bit more engineering than spackle alone. Anything larger than 6 inches, or damage that spans a stud bay, needs a proper cut-and-patch approach with backing support.
What caused it? A nail hole and a doorknob puncture look similar in size but come from different forces. Impact damage tends to crumble the gypsum core around the edges, meaning the "true" damaged area is often larger than the visible hole. Water damage is a different animal entirely — it softens, discolors, and weakens drywall well beyond the visible stain, and patching over it without addressing the moisture source is a guaranteed do-over.
Where is it located? A hole near a corner, a ceiling, or an area with electrical wiring or plumbing behind it changes your approach. Corners need bead reinforcement. Ceilings fight gravity while your mud is still wet. And anything near wiring means you shut off the breaker before you start cutting.
Once you've got honest answers to those three questions, the right repair method becomes obvious.
Small Holes: The Five-Minute Fix
Nail holes, screw holes, thermostat-relocation holes, and small dings under about an inch and a half fall into the easiest category of drywall repair — and trying to overcomplicate them is the most common way people waste a Saturday.
What you'll need
- Lightweight spackle or spackling paste
- A flexible putty knife (a 3-inch blade is ideal)
- Fine-grit sandpaper (220-grit) or a sanding sponge
- Primer and matching paint
The process
For anything smaller than a pencil eraser, spackle alone does the job. Press a small amount into the hole with your putty knife, holding the blade at a low angle to force the compound into the cavity rather than just smearing it across the surface. Scrape the excess flush with the wall. Lightweight spackles shrink very little as they dry, so one application is often enough, though deeper holes may need a second thin layer once the first has fully cured — usually a couple of hours, though humidity slows that down.
For dings up to about 1.5 inches, particularly the classic doorknob divot, a self-adhesive fiberglass mesh patch gives the compound something to grip so it doesn't just crack and fall out later. Center the patch over the hole, press it flat, then apply joint compound (not spackle, which isn't designed for spanning gaps) in thin layers, feathering the edges out several inches so the repair blends into the surrounding wall rather than sitting as a raised island.
Sand lightly between coats and after the final one, wiping away dust before priming. This last step trips up more DIYers than any other: skipping primer on a patched area causes the paint to absorb differently there than on the rest of the wall, creating a phenomenon painters call "flashing" — a dull or shiny patch that's invisible until the light hits it just right, at which point it becomes the only thing you can see.
The Awkward Middle: Holes Between 2 and 6 Inches
This size range is where spackle-only repairs fail and full cut-out repairs feel like overkill. The workhorse solution here is what's often nicknamed the "California patch" — a technique that uses the damaged drywall's own paper facing as a built-in anchor, without requiring you to cut into the wall cavity or add backing.
The California patch, step by step
- Cut a piece of scrap drywall about an inch larger on all sides than the hole.
- On the back of that patch, score a rectangle matching the hole's size, then snap and peel away the gypsum core within that scored line, leaving the front paper facing intact as a flexible border — essentially a paper-and-gypsum "flap" surrounding a solid center plug.
- Apply joint compound around the edges of the hole in the wall, then press the patch into place so the paper flange sticks to the surrounding drywall and the solid gypsum plug fills the hole itself.
- Once it's set, apply mesh tape over the seam, then two to three thin coats of joint compound, sanding lightly and feathering wide between coats.
For holes closer to the 4- to 6-inch range, pre-made adhesive-backed patch kits — thin aluminum or heavy-duty mesh patches sold at any hardware store — work similarly and are a reasonable shortcut if you don't have scrap drywall on hand. They're slightly less durable long-term than a true California patch but hold up fine for most household walls that won't take repeated impact in the same spot.
The key with mid-size holes is patience with the drying and sanding cycle. Rushing a single thick coat of mud instead of several thin ones is the most common reason mid-size patches crack within a few months.
Large Damage: 6 Inches and Beyond
Once you're past 6 inches, or the damage spans between wall studs, you're no longer patching — you're rebuilding a section of wall. This is a genuinely different project, and treating it like a bigger version of the small-hole fix is how people end up with a saggy, cracking repair that needs to be redone within a year.
What you'll need
- Drywall square and utility knife, or a drywall saw
- Replacement drywall matching the thickness of your wall
- Wood furring strips or drywall repair clips for backing
- Drywall screws and a screwdriver or drill
- Paper or mesh joint tape
- Joint compound (all-purpose or a lightweight setting-type compound for the first coat)
- A 6-inch and a 10- or 12-inch taping knife
- Sandpaper, primer, and paint
The process
Start by squaring off the damaged area. Even if the actual hole is irregular, cut a clean rectangle around it using a drywall square as your guide — a straight-edged patch is dramatically easier to install neatly than one that follows the ragged outline of the original damage. If the hole falls between studs, you'll need backing for the new piece to attach to, since drywall screws need something solid behind them. Wood furring strips (sometimes called cleats) screwed to the inside face of the surrounding drywall, spanning into the cavity on either side of the cutout, give the new patch something to bite into. Alternatively, drywall repair clips — small metal brackets designed for exactly this situation — skip the need for scrap wood entirely and are worth the few extra dollars for how much cleaner they make the process.
Cut your replacement drywall to fit the opening, matching the board's thickness exactly. Screw it into the backing every 6 to 8 inches around the perimeter, driving screws just deep enough to dimple the paper without tearing it. Tape all four seams — paper tape embedded in a layer of joint compound is stronger for long seams and large patches, while self-adhesive mesh tape is faster and fine for smaller runs, though it benefits from a setting-type compound for the first coat since it's more prone to cracking under regular mud.
Apply your first coat, embedding the tape and filling the screw dimples. Let it dry fully, then apply a second, wider coat that feathers 8 to 12 inches beyond the taped seams. A third, even wider finishing coat smooths out any remaining ridges. Sand between each coat, and resist the urge to skip straight to a single thick application — thick mud takes far longer to dry, is more prone to cracking, and is genuinely harder to sand smooth. If the repair sits near an outside corner, install new corner bead before mudding, since a missing or damaged bead is one of the most common reasons large repairs never quite look finished.
When the Hole Is a Symptom, Not the Whole Problem
Not every hole is purely cosmetic, and treating a symptom while ignoring its cause is how small repairs turn into recurring ones.
Water stains and soft spots mean there's moisture getting into the wall from somewhere — a roof leak, a plumbing issue, condensation from poor ventilation, or a slow leak around a window. Patch over it without finding and fixing the source, and you'll be back at the same wall within a season, possibly dealing with mold by then. If you find soft, crumbling, or discolored drywall, cut back until you reach solid, dry material before patching, even if that means a larger cutout than the visible stain suggested.
Cracks that run diagonally from door or window corners, or long horizontal cracks near where a wall meets the ceiling, often point to normal home settling rather than impact damage. These can usually be repaired with mesh tape and compound, but if they keep reappearing in the same spot, it may indicate ongoing structural movement worth having a contractor look at.
Older homes deserve an extra note of caution. Textured ceilings and some wall materials installed before the early 1980s can contain asbestos, and sanding or cutting into them without testing first is a genuine health risk. The Environmental Protection Agency maintains guidance on lead-safe renovation practices for homes built before 1978, when lead-based paint was banned for residential use — relevant if you're sanding through old paint layers as part of a repair. If you're at all unsure about your home's age-related materials, a lab test on a small sample is inexpensive insurance before you start generating dust.
Anything near an electrical box, outlet, or visible wiring means shutting off the relevant breaker before you cut into the wall, and stopping entirely if you're not confident distinguishing what you're looking at. The Consumer Product Safety Commission tracks home renovation injury and hazard data, and electrical contact remains one of the more preventable categories of DIY injury.
Tools and Materials, Sorted by Job Size
A quick reference, since half the frustration of drywall repair comes from realizing mid-project you're missing something:
For small holes (under 2 inches): lightweight spackle, a 3-inch putty knife, fine sandpaper, self-adhesive mesh patches for anything approaching 1.5 inches, primer, and touch-up paint.
For mid-size holes (2 to 6 inches): scrap drywall or a store-bought patch kit, joint compound, mesh tape, a 6-inch taping knife, sandpaper, primer, and paint.
For large repairs (6 inches and up): replacement drywall matched to your wall's thickness, wood furring strips or drywall repair clips, drywall screws, paper or mesh tape, joint compound (ideally both a setting-type compound for the first coat and all-purpose for finishing coats), a 6-inch and a 10- to 12-inch taping knife, corner bead if applicable, sandpaper at multiple grits, primer, and paint.
Across every size category, the tools that get skipped most often — and shouldn't be — are a proper sanding sponge (rather than folded sandpaper, which is harder to control) and a bright work light held at a low angle across the wall. That raking light is how professional tapers catch ridges and low spots before the paint does it for them.
The Mistakes That Turn a Small Job Into a Big One
A handful of errors show up again and again in drywall repairs, regardless of the damage size:
Skipping primer before painting a patch. Joint compound is far more porous than painted drywall, and it absorbs paint differently, producing that telltale flashing effect under certain light.
Applying mud too thick, too fast. Every taper who's been doing this for years will tell you the same thing: three thin coats beat one thick coat, every time. Thick applications crack, take longer to dry, and are miserable to sand smooth.
Using spackle where joint compound was needed, or vice versa. Spackle is fine for tiny holes but isn't meant to span gaps or hold tape. Joint compound is the right choice anywhere tape or a patch is involved.
Forgetting to feather the edges. A patch that ends abruptly, without gradually thinning out into the surrounding wall, will always be visible as a slightly raised rectangle, no matter how well the color matches.
Not addressing the underlying cause. Whether it's a water leak, a door that swings too far and hits the wall, or settling cracks, a patch without a fix for the root cause is a temporary solution wearing a permanent one's clothes.
Frequently Asked Questions
Is spackle the same as joint compound? No. Spackle is a lightweight, fast-drying compound suited to small, shallow holes. Joint compound is designed to be applied over tape and spans larger areas without cracking, but it dries more slowly and shrinks more as it cures.
Do I need to prime a drywall patch before painting? Yes, always. Unprimed joint compound absorbs paint differently than the surrounding painted wall, which creates a visible sheen or color mismatch once the paint dries.
Can I repair a large hole without cutting into the wall? Once damage exceeds roughly 6 inches or spans between studs, a solid patch generally needs backing to attach to. Skipping this step tends to produce a repair that flexes, cracks, and eventually fails.
How long should I wait between coats of joint compound? Standard joint compound typically needs at least several hours to overnight to dry fully between coats, depending on humidity and coat thickness. Setting-type compounds dry chemically rather than by evaporation and can be recoated much sooner, which is why many professionals use them for the first coat on larger repairs.
When should I call a professional instead of DIY-ing it? Water damage beyond a small spot, mold, cracks tied to structural settling, ceiling repairs (which fight gravity while wet), and anything involving load-bearing walls are all reasonable moments to bring in a contractor rather than push through solo.
Where to Verify Before You Buy
Product specifications, especially around fire-rated and moisture-resistant board, are worth confirming directly with manufacturers rather than relying on secondhand hardware-store advice. A few reliable starting points:
- USG — USG Corporation, 550 West Adams Street, Chicago, IL 60661.
- National Gypsum — National Gypsum Company, 2001 Rexford Road, Charlotte, NC 28211.
- CertainTeed — CertainTeed, 20 Moores Road, Malvern, PA 19355.
- U.S. Consumer Product Safety Commission — 4330 East West Highway, Bethesda, MD 20814.
- U.S. Environmental Protection Agency — 1200 Pennsylvania Avenue NW, Washington, DC 20460.
For general technique walkthroughs and tool comparisons, This Old House and Family Handyman are two of the more consistently reliable independent resources in the home-repair space.
The Bottom Line
Drywall damage isn't a single problem with a single fix — it's a spectrum, and the right approach depends entirely on where your particular hole falls on it. A nail hole wants ninety seconds and a putty knife. A doorknob ding wants a mesh patch and some patience through the drying cycle. Anything bigger than your hand wants a proper cutout, backing, and the discipline to apply compound in thin, feathered layers rather than one satisfying-but-doomed thick coat.
The wall will forgive almost any repair, as long as it's the right one for the damage in front of you. Diagnose honestly, match your materials to the size of the job, and resist the temptation to rush the drying time — and that dent that's been bothering you every time you walk past it will disappear for good, not just until the next humid afternoon reveals where the shortcut was taken.