
Sanded vs. Unsanded Tile Grout: When to Use Each
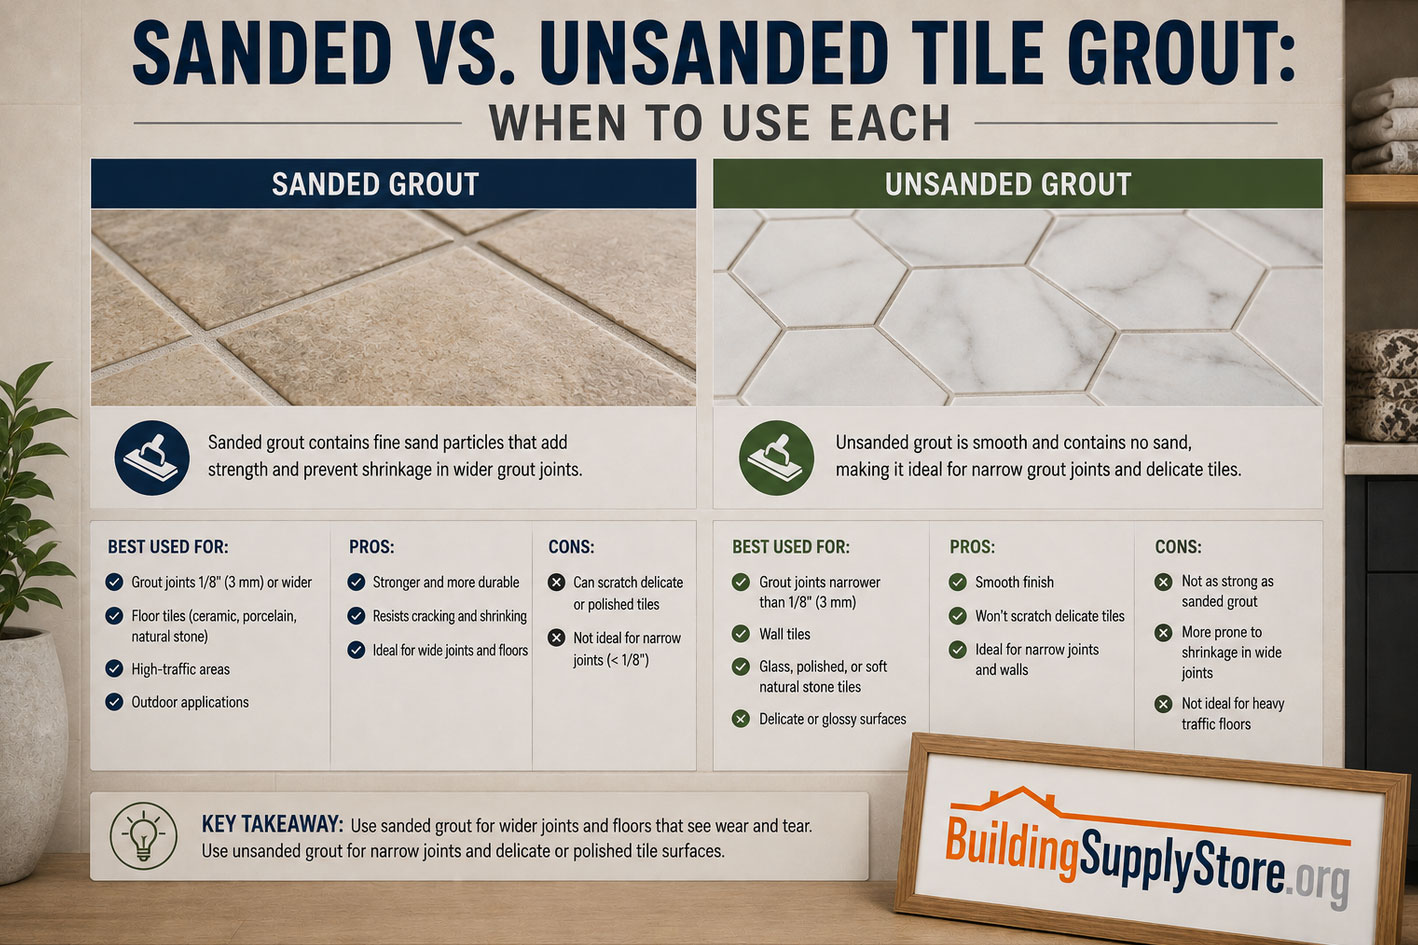
Grout gets blamed for a lot of things it didn't cause. Cracked tile, water damage, a bathroom that looks tired after two years — homeowners point fingers at the stuff between the tiles long before they consider the mortar underneath or the moisture behind the wall. But there's one grout mistake that really does belong to grout itself, and it happens more often than any tile setter would like to admit: using the wrong type for the job.
There are really only two workhorse categories of cement-based grout — sanded and unsanded — and the difference between them isn't a matter of taste or brand loyalty. It's physics. One contains fine aggregate, the other doesn't, and that single variable determines how each performs in a joint, on a wall, around a pool, or under a bare foot at 6 a.m. Get the match wrong and you're not looking at a cosmetic issue. You're looking at cracked lines, pitted surfaces, or grout that simply falls out within a season.
This guide walks through what separates the two, where each one belongs, where they overlap, and where a third option — epoxy — quietly outperforms both.
What Tile Grout Actually Does
Grout isn't just filler. It locks tiles in place, keeps water and debris out of the joints, and gives the whole installation the structural give it needs to handle minor movement without tiles chipping against each other. Underneath the color and finish, grout is almost always Portland cement blended with additives for whiteness, flexibility, and water resistance — and, depending on the joint it's meant for, sand.
That last ingredient is where the entire sanded-versus-unsanded conversation begins.
The Real Difference: One Has Sand, One Doesn't
What's in Sanded Grout
Sanded grout is cement grout with fine aggregate mixed in. The sand acts as a bulking agent — it gives the mixture body, helps it resist shrinkage as it cures, and keeps it from cracking or pulling away from tile edges in wider joints. The aggregate is what makes sanded grout noticeably more durable than its unsanded counterpart, mainly because unsanded grout tends to shrink and pull away from tile as it dries, while the added sand keeps that shrinkage in check.
The trade-off is texture. Sanded grout has a gritty, slightly rough finish, and that grit has to go somewhere during application — including, if you're not careful, across the face of a soft or polished tile.
What's in Unsanded Grout
Unsanded grout is the same cement base, minus the aggregate, often with more polymer added to compensate for the lost bulking strength. The result is a smoother, thinner mixture that behaves very differently on a trowel and in a joint. It's stickier, clings to vertical surfaces more readily, and won't scratch delicate finishes the way sand can.
The catch: without aggregate, unsanded grout has less resistance to shrinkage. Pack it into a joint that's too wide and it can crack, slump, or pull away entirely.
The One Rule That Actually Matters: Joint Width
Every tile professional, manufacturer, and standards body more or less agrees on this: the decision comes down to how wide the gap between tiles is — not the room, not the tile material, not personal preference. According to the Tile Council of North America, joints smaller than 1/8 inch generally should only be grouted with unsanded grout, joints of 1/8 inch and wider should only be grouted with sanded grout, and joints larger than 3/8 inch usually call for a more heavily sanded, wide-joint mix.
That threshold — 1/8 inch — is worth memorizing before you ever open a bag. It's the dividing line the entire industry builds around, from big-box product labels to professional spec sheets.
| Joint Width | Recommended Grout |
|---|---|
| Under 1/16 inch | Unsanded (very tight joints, mosaics, rectified tile) |
| 1/16 inch to 1/8 inch | Unsanded |
| 1/8 inch (borderline) | Either, depending on tile type and location — sanded typically preferred for floors |
| 1/8 inch to 3/8 inch | Sanded |
| Over 3/8 inch | Heavily sanded or wide-joint mix |
Everything else people obsess over — color-matching, sealing schedules, whether to use a rubber float or a sponge — matters far less than getting this measurement right.
Sanded vs. Unsanded Grout: Side-by-Side Comparison
| Feature | Sanded Grout | Unsanded Grout |
|---|---|---|
| Composition | Cement + fine sand aggregate | Cement + polymer additives, no sand |
| Best joint width | 1/8 inch and wider | Under 1/8 inch |
| Texture | Coarse, gritty | Smooth, sticky |
| Shrinkage resistance | High | Lower |
| Risk of scratching tile | Higher on polished/soft surfaces | Minimal |
| Vertical adhesion | Moderate | Excellent |
| Typical use | Floors, patios, wide-joint mosaics, heavy-traffic areas | Walls, showers, backsplashes, polished stone, narrow joints |
| Cost | Generally lower | Generally higher |
| Ease of cleanup | Slightly harder (texture holds haze) | Easier, smoother finish |
| Sealing required | Usually, unless pre-sealed or epoxy-based | Usually, unless pre-sealed or epoxy-based |
| Coverage (typical) | One 25-pound bag covers roughly 100 square feet | Roughly two 10-pound boxes needed to cover the same area |
When to Use Sanded Grout
Sanded grout is the default choice for most floor installations, and for good reason — it's built to handle joints wide enough to accommodate foot traffic, temperature shifts, and the natural irregularities of larger-format tile. Reach for sanded grout when:
- Your joints are 1/8 inch or wider. This is non-negotiable. Below that width, sand can't pack properly and will leave voids or pinholes.
- You're grouting a floor. Sanded is generally preferred for floors, where load distribution, abrasion resistance, and joint-profile durability under traffic matter most.
- You're working outdoors or around a pool. Sanded grout provides the mechanical backbone needed to resist movement, temperature swings, and hydraulic pressure on exterior walkways and submerged basins.
- You're tiling with rustic, hand-molded, or large-format tile. These tend to have wider, less uniform joints that need sand's bulking strength.
- Budget matters. Sanded grout is typically the less expensive of the two.
Where it doesn't belong: polished marble, honed limestone, glass tile, or any finish that scratches easily. The sand that makes it strong is the same sand that can dull a glossy surface during application.
When to Use Unsanded Grout
Unsanded grout earns its keep anywhere precision and adhesion matter more than bulk strength. Reach for it when:
- Your joints are under 1/8 inch. Small-format tile, mosaics, and rectified tile (tile cut to precise, tight-fitting edges) almost always fall into this category.
- You're grouting a vertical surface. Its smooth texture clings firmly to vertical surfaces, which is why it's the standard choice for shower walls and backsplashes.
- You're working with polished or honed natural stone. Sanded grout can scratch highly polished stone like marble, making unsanded the safer choice.
- You're setting glass, metal, or other delicate tile. Unsanded grout is well suited to wall tile, polished natural stone, metal tiles, glass tiles, and mosaic sheet tiles.
- You want a smoother finished look. The absence of grit means a cleaner, less textured joint line — a small but real aesthetic difference in a backsplash you'll be staring at daily.
Walls vs. Floors: Why Location Changes the Math
Joint width drives the decision, but location reinforces it. Walls rarely see the same wear as floors — no foot traffic, no furniture legs, no dropped cast-iron skillets — so they can get away with a grout that prioritizes adhesion and finish over raw compressive strength. That's exactly what unsanded grout offers.
Floors are the opposite story. They absorb constant mechanical stress, and any grout joint without enough shrinkage resistance will eventually crack, crumble, or need premature repair. Sanded grout's aggregate structure is built for exactly that kind of punishment, which is why it's the near-universal default for flooring — even at joint widths right at the 1/8-inch line, where either type is technically viable.
Polished, Honed, and Delicate Tile: The Exception That Overrides Everything Else
There's one scenario where joint width takes a back seat: delicate tile surfaces. Marble, limestone, glass, and some metal tiles scratch under the abrasive texture of sanded grout, regardless of how wide the joint is. In these cases, professionals often lean toward unsanded grout even at joint widths that would normally call for sanded — or they compensate with careful application technique, using diagonal float strokes and immediate cleanup to minimize contact time between the sand and the tile face.
If you're not sure whether your stone or glass tile can handle sanded grout, the safer move is to test a small, inconspicuous section first, or default to unsanded and accept the slightly higher shrinkage risk in exchange for a scratch-free surface.
Common Mistakes People Make With Grout Selection
Choosing grout by room instead of by joint width. "Bathroom grout" and "kitchen grout" aren't real categories. A bathroom floor with 1/4-inch joints needs sanded grout; a bathroom shower wall with 1/16-inch joints needs unsanded. The room doesn't decide — the joint does.
Mixing sanded and unsanded grout in the same batch. Sanded and unsanded grout should never be mixed together, and neither should be used with marble or other scratch-prone surfaces without accounting for the sand's abrasiveness. Blending them defeats the engineering behind both products.
Grouting before the thinset has cured. Waiting at least 24 hours after tile installation before grouting is standard practice, extending to 48 hours in cold or humid conditions — grouting too soon can shift tiles and weaken the bond layer entirely. This has nothing to do with sanded versus unsanded, but it will undermine either type if skipped.
Forcing sanded grout into narrow joints. Sanded grout pushed into joints narrower than 1/16 inch won't pack properly and leaves voids. If your spacers left tighter-than-expected gaps, switch products rather than fighting the material.
Assuming the "intended" joint width is the real one. Tile doesn't always sit exactly where the spacers say it will. Grout type should match the actual joint width on the installed tile, not the width that was originally planned, since real-world results vary.
Beyond Sanded and Unsanded: When Neither Is the Right Call
Cement-based grout — sanded or unsanded — isn't always the best tool for the job. For the most demanding wet environments, such as steam showers and pools, two-part epoxy grout is considered the gold standard, prized for being stain-proof, waterproof, and chemically resistant while curing hard yet retaining some flexibility and never needing to be sealed.
Epoxy costs more and is less forgiving to install — it sets faster and doesn't clean up as easily — but for high-moisture, high-stakes environments, it solves problems neither sanded nor unsanded cement grout can. There are also single-component urethane and acrylic grouts on the market now, marketed as more DIY-friendly alternatives that skip the mixing hassle of epoxy while still offering better flexibility than standard cement grout — a useful option for heated floors, where expansion and contraction from temperature swings can stress a rigid joint.
Quick-Answer FAQ
Can you use unsanded grout on a floor? Technically yes, if the joints are under 1/8 inch — small mosaic floors, for example. But for standard floor tile with wider joints, sanded is the stronger, more shrink-resistant choice.
Is sanded grout always stronger than unsanded? In wider joints, yes. In joints under 1/8 inch, sanded grout can't pack properly and actually performs worse, leaving gaps and pinholes.
Will sanded grout scratch my tile? It can, particularly on polished stone, glass, and some metal finishes. Test a hidden area first, or use unsanded grout on anything you're not willing to risk scuffing.
Can I mix sanded and unsanded grout together? No. They're formulated differently, and combining them undermines the performance of both.
Does unsanded grout need to be sealed? Most cement-based unsanded grout still benefits from sealing to resist staining, unless it's a pre-sealed or epoxy formulation.
What if my joint is exactly 1/8 inch? This is the genuine gray zone. Either type can work, but sanded is usually favored for floors and high-traffic areas, while unsanded is often chosen for walls and delicate tile at that same width.
How long does grout need to cure before sealing? Most manufacturers recommend waiting 48 to 72 hours after grouting before applying sealer, though this varies by product — always check the specific data sheet.
The Final Verdict
The sanded-versus-unsanded debate isn't really a debate once you strip away the marketing language and get down to the mechanics. Measure the joint. If it's under 1/8 inch, use unsanded. If it's 1/8 inch or wider, use sanded — unless the tile itself is delicate enough that scratching outweighs the shrinkage risk, in which case unsanded wins by default. Everything else — color, brand, finish — is preference. The width of the gap between your tiles is the only variable that actually dictates performance, and it's the one measurement worth taking twice before you open a bag.