
Epoxy Resin for Beginners: Tabletop Pours, River Tables & Repairs
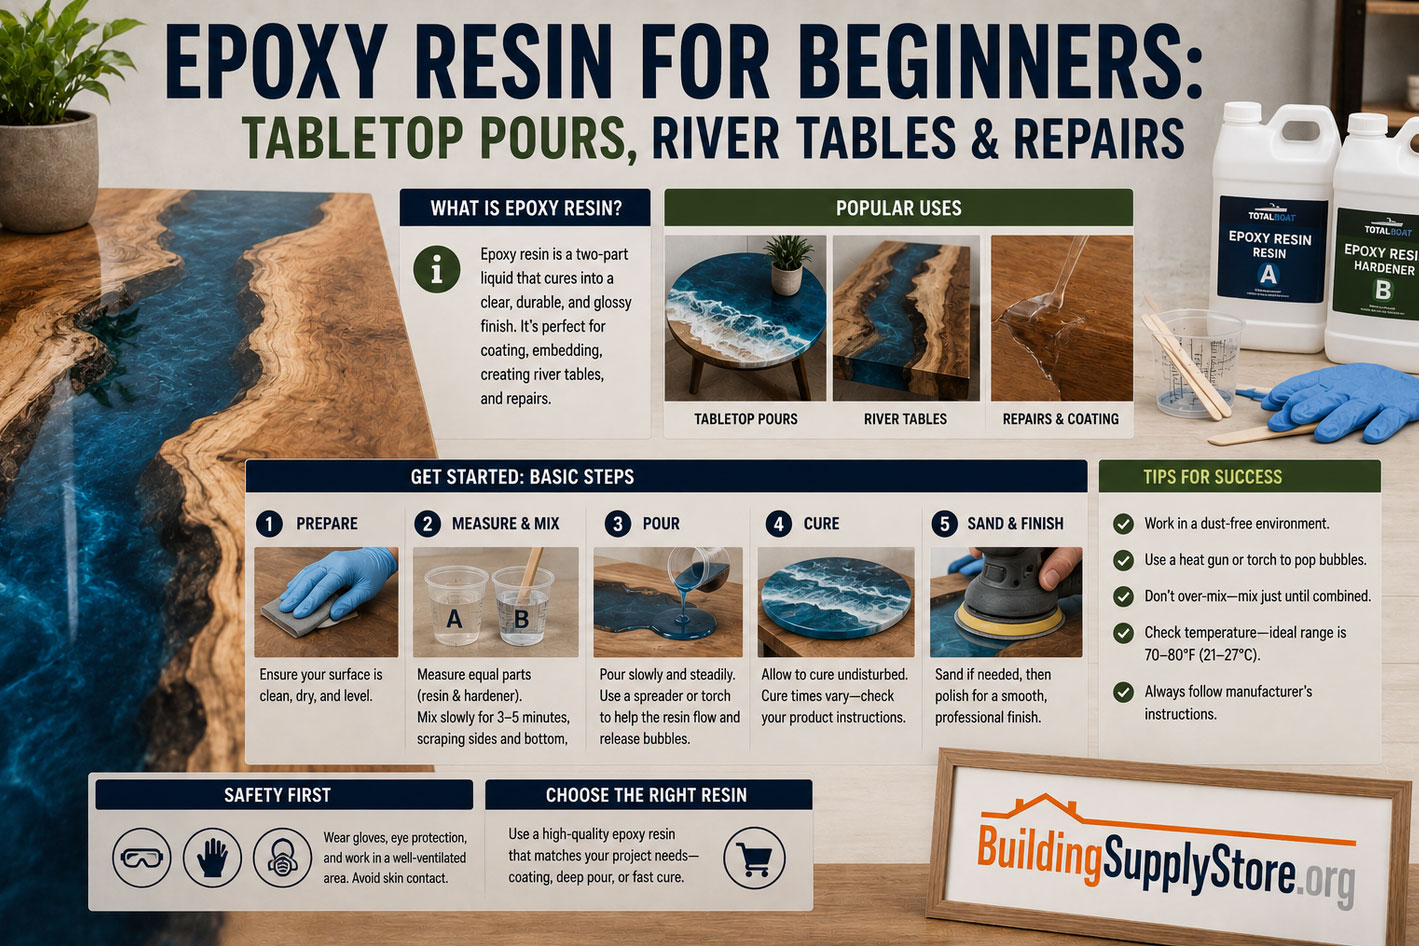
Epoxy resin has quietly become the duct tape of the modern workshop. It fills cracks, floods tabletops with glass-like shine, and turns a slab of live-edge walnut into the kind of river table people photograph before they even sit down. And yet most beginners approach their first pour the way they'd approach a chemistry final they didn't study for — nervous, under-informed, and one bad ratio away from a sticky mess.
It doesn't have to be that way. Epoxy is forgiving once you understand the handful of rules that actually matter. This guide walks through the three doors most beginners walk through first — tabletop pours, river tables, and repairs — along with the mistakes that trip people up and the resources worth bookmarking before you buy a drop of product.
What Epoxy Resin Actually Is
Epoxy resin is a two-part liquid plastic. Part A (the resin) and Part B (the hardener) sit inert on their own, but once combined in the correct ratio, they trigger an exothermic chemical reaction called curing. Over a period ranging from a few hours to several days, the liquid transforms into a hard, glass-like solid.
That's the entire concept. Everything else — deep pour formulas, UV-resistant topcoats, fast-cure tabletop blends — is just a variation on that same two-part reaction, engineered for a specific job. A coating epoxy is formulated to self-level in thin layers. A casting or deep-pour epoxy is formulated to cure slowly enough that it doesn't overheat, crack, or yellow when poured several inches thick. Using the wrong one for the wrong job is where most beginner disasters start.
The Three Doors Beginners Walk Through
Almost everyone who picks up epoxy resin for the first time is chasing one of three outcomes:
- A tabletop pour — flooding a wood or concrete surface with a clear, glossy coating.
- A river table — filling the gap between two live-edge wood slabs with tinted or clear resin to mimic flowing water.
- A repair — filling a crack, knot, void, or section of rot in furniture, flooring, or outdoor wood.
Each one uses the same base chemistry but demands a different product, a different mold strategy, and a different tolerance for error. Let's take them one at a time, starting with the ground rules that apply no matter which door you walk through.
Getting Started: The Non-Negotiables
Mix Ratios Aren't Suggestions
Every epoxy product ships with a mix ratio — usually 1:1 or 2:1, resin to hardener, measured by volume or weight. This number is not a starting point to be eyeballed. Under-mixing the hardener leaves you with a soft, tacky surface that never fully cures. Over-mixing it can cause premature curing, excess heat, or a cloudy finish. Buy a digital scale if your product specifies mixing by weight — it removes the guesswork that ruins more first pours than any other single mistake.
Ventilation and Protective Gear
Epoxy resin isn't as aggressively fumey as some other resins, but the hardener component can still irritate skin, eyes, and lungs, especially in an enclosed garage. Nitrile gloves, safety glasses, and a well-ventilated space (open windows, a box fan pulling air outward) are the baseline. If you're sanding cured epoxy, add a dust mask — the sanding dust is a different hazard than the liquid fumes.
Temperature and Humidity Control
Epoxy cures best between roughly 70–75°F (21–24°C) with low humidity. Pour in a cold garage and the resin thickens, traps bubbles, and cures unevenly. Pour in a humid bathroom and you risk a hazy, "blushed" finish called amine blush, where moisture reacts with the surface of the curing resin. A cheap indoor thermometer-hygrometer pays for itself on the first project.
Tabletop Pours for Beginners
Tabletop pours are the most approachable entry point, which is exactly why so many beginners start here.
Choosing Your Resin
Two categories matter for tabletops. A coating (tabletop) epoxy is designed for thin, self-leveling layers — typically no more than an eighth of an inch per pour — and it's what you want for a clear topcoat over a finished wood or painted surface. A casting or deep-pour epoxy is formulated for thicker pours and cures more slowly to avoid overheating. If your project involves embedding objects, photos, or bottle caps in a layer thicker than a quarter inch, you want a casting formula, not a standard tabletop coat.
Prepping the Surface and Building a Dam
Sand the surface smooth (220 grit is a common finishing step), wipe it clean of dust, and seal any porous wood with a thin seal coat first — this prevents outgassing, where trapped air in the wood bubbles up through your final pour. Then build a dam around the edges using painter's tape and a rigid barrier (wood strips, foam board, or purpose-made resin dam tape) to contain the liquid while it's still fluid.
Pouring in Layers vs. Flood Coats
Most tabletop projects use a thin seal coat first, followed by one or two flood coats poured 24 hours apart once each layer is tacky but not fully cured — this helps the layers chemically bond rather than just sitting on top of each other. Pouring too thick in a single pass with a standard coating resin is a common way to trigger excess heat and cracking.
Chasing Out Bubbles
Bubbles are inevitable during mixing. A butane kitchen torch or a heat gun waved briefly across the surface pops them by lowering the resin's surface tension — just don't linger in one spot, or you'll scorch the finish. Do this pass within the first ten to fifteen minutes after pouring, before the resin starts to thicken.
River Tables: Where Woodworking Meets Chemistry
River tables ask more of you than tabletops do, because you're not just coating a surface — you're building a mold, managing a much larger volume of resin, and controlling heat across a thick pour that can run for days.
Picking Your Slab
Live-edge slabs — walnut, maple, and oak are common choices — need to be kiln-dried or thoroughly air-dried before you build with them. Wood that's still holding moisture will continue to move and can crack the resin around it months later. Inspect the natural edge for loose bark, punky (soft, rotted) wood, and deep checks that may need to be stabilized with a thin epoxy seal coat before the main pour.
Building the Mold
Melamine board is the standard mold material because cured epoxy releases from it cleanly. Seams need to be sealed with silicone caulk — not hot glue, which resin can seep through — and the entire mold should be built slightly wider than your slabs to leave room for the "river" channel. A mold release wax or spray on the melamine adds an extra layer of insurance against a stuck pour.
The Pour Itself: Deep Pour Resin and Heat Management
This is where product choice matters most. A deep-pour epoxy is engineered to cure slowly and release heat gradually, which is essential once you're filling a channel that might be one to three inches deep. Standard tabletop resin poured that thick can overheat dramatically enough to crack, cloud, or even scorch the wood along the edges — a failure mode sometimes called a "volcano," where the exothermic reaction runs away and the resin bubbles up and out of the mold.
For anything deeper than roughly two inches, most experienced builders pour in stages — a base layer, a cure period, then subsequent layers — rather than filling the entire channel in one pass, even with a deep-pour product. Tinting the resin with alcohol inks, mica powders, or dedicated resin dyes is typically done at this stage, mixed in small batches so you can control color gradients across the "river."
Sanding and Finishing
Once fully cured (deep pours often need three to seven days before they're hard enough to work), the table comes out of the mold and heads to the sander. Progressive grits — starting around 80 or 100 and working up through 220 or higher — bring the resin and wood flush and remove mold-line ridges. A final coat of tabletop epoxy or a UV-stable polyurethane seals the whole surface and restores the glass-clear shine that sanding dulls.
Repairs: Epoxy's Quiet Superpower
Repairs are the least glamorous use of epoxy and arguably the most useful. This is where resin earns its keep on furniture, flooring, cutting boards, and outdoor structures.
Filling Cracks, Knots, and Voids
Small cracks, knife-cut cutting boards, and loose knots in a table slab are ideal candidates for a straightforward epoxy fill. Clean the void of dust and debris, tape off the underside if the crack runs through the piece, and pour slowly to avoid trapping air at the bottom. For anything narrow and deep, a syringe or squeeze bottle gives you more control than pouring straight from a mixing cup.
Wood Rot Repair
Epoxy is a mainstay of exterior wood repair — window sills, porch columns, deck posts — because it can rebuild structural strength in wood that's partially rotted. The process typically involves two products: a penetrating epoxy consolidant, which soaks into softened wood fibers and hardens them from the inside, followed by a thicker epoxy filler paste that's sculpted and sanded to rebuild the missing shape. Done correctly, this can add years to a piece that would otherwise need full replacement.
Color-Matching with Dyes and Pigments
Repairs on visible surfaces — a chipped countertop edge, a gouge in stained furniture — often need tinted epoxy to blend in rather than stand out. Universal tint pigments, powdered mica, and even artist's acrylic paint (used sparingly) can shift clear epoxy toward the surrounding wood tone. Mixing a small test batch and letting it cure fully before committing to the real repair saves a lot of regret, since epoxy color can shift slightly as it cures.
Common Beginner Mistakes (and How to Avoid Them)
- Eyeballing the mix ratio. Use a scale or graduated mixing cups every time — an off-ratio batch may never fully harden.
- Skipping the seal coat on raw wood. Unsealed, porous wood releases trapped air into your flood coat, creating a field of tiny craters called "fisheyes" or pinholes.
- Pouring too thick with the wrong product. Match the resin type to the pour depth; deep-pour and coating epoxies are not interchangeable.
- Working in a cold or humid space. Both slow curing and increase the odds of a cloudy, blushed finish.
- Mixing too large a batch at once. Bigger batches generate more heat and cure faster than expected, shortening your working window and raising the risk of cracking.
- Rushing demold or recoat times. Every product lists specific cure windows — follow them rather than testing with a fingernail.
- Ignoring the manufacturer's data sheet. Every brand's formula behaves slightly differently; the technical data sheet on the product page is more reliable than general internet advice, including this article.
Tools and Materials Worth Owning
Before the first project, it's worth assembling a small kit rather than buying piece by piece mid-pour:
- A digital gram scale for accurate mixing
- Graduated silicone mixing cups (reusable once resin is peeled out)
- Nitrile gloves and safety glasses
- A butane torch or heat gun for bubble removal
- Painter's tape and either resin dam tape or melamine strips
- 80–220 grit sandpaper for finishing work
- A dedicated stir stick or paint-mixing paddle for a drill
Where to Buy Epoxy Resin & Supplies
A handful of brands dominate the beginner and hobbyist resin market, each with a slightly different specialty. Below are a few worth knowing, including physical addresses for the manufacturers that maintain a public storefront or plant you can contact directly.
- TotalBoat — Marine-grade epoxies and a strong lineup of tabletop and deep-pour products, backed by Jamestown Distributors. Headquarters: 17 Peckham Drive, Bristol, RI 02809.
- West System — Made by Gougeon Brothers, Inc., a long-standing name in marine and woodworking epoxy with an emphasis on structural strength. Headquarters: 100 Patterson Avenue, Bay City, MI 48706.
- Alumilite — Known for casting resins, mold-making silicones, and river-table-friendly deep-pour formulas. Headquarters: 2612 Kersten Court, Kalamazoo, MI 49048.
- EcoPoxy — A woodworker-focused brand built around deep-pour river table resin and clear tabletop coatings.
- Stone Coat Countertops — Popular for countertop-specific epoxy kits, tutorials, and beginner-friendly color systems.
Local options are worth checking too — many woodworking and hardware stores carry starter kits sized for a first project, which is a lower-risk way to learn the material before investing in gallon-sized batches.
Frequently Asked Questions
How long does epoxy resin take to cure? Most tabletop epoxies are tack-free within 24 hours and fully cured (hard enough for regular use) within 3 to 7 days. Deep-pour formulas for river tables often need a full week or more before demolding and sanding.
Can I use regular tabletop epoxy for a river table? Not for the deep channel. Standard coating epoxy generates too much heat when poured more than about a quarter to half an inch thick, which can crack or cloud the resin. Use a deep-pour or casting formula for anything thicker.
Why is my epoxy still tacky after 24 hours? The most common cause is an inaccurate mix ratio. Cold temperatures during cure can also slow hardening significantly — check the room temperature before assuming the batch is bad.
Do I need a respirator for epoxy resin? For occasional small pours in a well-ventilated space, gloves, eye protection, and open airflow are usually sufficient. For large pours, enclosed spaces, or extended sanding sessions, a respirator rated for organic vapors and a dust mask for sanding add meaningful protection.
Can epoxy resin be used outdoors? Standard epoxy will yellow under UV exposure over time. For outdoor furniture or repairs, look for a UV-stabilized epoxy or plan to add a UV-resistant topcoat over the cured resin.
What's the difference between resin and epoxy resin? "Resin" is a broad term that includes polyester resin, polyurethane resin, and UV resin, among others. Epoxy resin refers specifically to the two-part resin-and-hardener system described in this guide, prized for its clarity, adhesion, and relatively low shrinkage during cure.
The Last Coat
Epoxy resin rewards patience more than talent. The people who get clean, glass-smooth results on their first try usually aren't the most artistic — they're the ones who read the technical data sheet, weighed their ratios, and respected the cure time instead of rushing it. Start small: a coaster, a serving tray, a single crack repair on a piece nobody will miss if it goes wrong. Once you've got a feel for how the material moves and cures, the tabletop pours, river tables, and repairs that first felt intimidating start to feel like just another Saturday project.